RESTful controllers
In this post we will explore how to create a restful controller with Asp.Net Core. We are going to look at it with an example of a controller that exposes some CRUD API to the outside world. To do this we are going to map the appropriate http Verbs onto the action methods that should be supplied.
What this post will cover:
- How a RESTful controller would look like in Asp.Net Core
- Brief overview of REST
- My personal opinion about Restful controller and how I would create one
- An example of a CRUD restful controller.
What this post will not cover:
- Details on REST (architecture, HATEOAS etc.)
- Design of “good” (whatever that is) REST api
- All theHttp verbs like Patch, Head
- How to test your API
- How to set up an web API project and how to run it
For more references on how to create a controller in AspNetCore, or on API controllers in general refer to my posts:
What does Restful mean
In the post about API controllers we shortly looked at REST and how this has formed some of the decisions how the Asp.Net Core Web API was designed.
There is a lot of discussion about what counts as Restful services. I try to look at it not from a dogmatic perspective but rather from a practical standpoint. As with every technique, REST is simply a tool that can be used to ease the process to solve your problem at hand.
I will not recite what REST means at this point, there are lots of references on the internet as well as on my blog. I will only talk about it the way I understand it and how to use it with Asp.Net Core Web API.
- An entity that is stored on a server can be viewed as a Resource. This Resource can then be transferred to a requesting client as a specific requested representation of this Resource. This could be done as some formatted JSON or XML object, or as a binary format like a gif/png or any other type (maybe also as HTML). This representation should be requestable by content negotiation.
- To change the state of an entity, the requesting client should do this with a representation of the Resource in question.
- A request should either yield the Resource with the appropriate representation or should yield a applicable status code, that lets the requesting client deduce what went wrong.
- If appropriate the response should have a reference/links that indicate the possible actions (HATEOAS) (not included in this introduction)
- The url for the restful service should indicate which version is used, and should indicate if you are requesting the API or some HTML documents. The version could also be supplied via http header, but I personally prefer the url versioning technique for reasons of clarity.
Next up I am going to show you how this would be represented with Asp.Net Core and Web API. I skip the creation of the project via the visual studio Web Api template. The name of the project at hand will be mywebapi.
CRUD controller
We will explore the design of a Restful api controller with Web Api by looking at a controller, that creates a CRUD– like http endpoint. CRUD that is as you might already know, Create, Read, Update, Delete for a given entity type. This needs to be matched to http Verbs to distinguish the applicability of the different operations. We will ignore Firewalls and such for now and assume that we can use all Verbs without restrictions. (some firewall settings only allow for GET and POST)
So for a Read we simply use the http GET Verb that a browser would use to request a resource representation. A browser will for the most part request HTML, which is not very useful for a Web API, because we will not have access to the Razor Engine (I assume that one uses the AddMvcCore extension to setup an api controller) and therefore cannot utilize the ViewResult. So to test this controller, we would need something like Postman, curl or PowerShells webInvoke cmdlet. See my post about testing a Web Api with those approaches here. In this post we are going to see the use of Postman.
To demonstrate the basic ideas we will use a generic and abstract entity of Type Resource with an Id and a Name like so:
public class Resource
{
public int Id { get; set; }
public string Name { get; set; }
}
The public properties are needed for Asp’s model binding.
We use a controller that derives from ControllerBase, as I recommend you always do in my previous posts about controllers. For data we inject an IResourceRepository by setting it up in the startup classes configure method. This will be an InMemory repository just for demonstrations sake.
The interface of the repository looks as follows:
public interface IResourceRepository
{
void Save(Resource resource);
Resource Find(int id);
IEnumerable<Resource> FindAll();
void Delete(Resource resource);
}
// implementation
public class InMemoryResourceRepository : IResourceRepository
{
private readonly List<Resource> items = new List<Resource>();
public void Delete(Resource resource)
{
Resource item = Find(resource.Id);
items.Remove(item);
}
public Resource Find(int id)
{
return items.FirstOrDefault(x => x.Id == id);
}
public IEnumerable<Resource> FindAll()
{
return items;
}
public void Save(Resource resource)
{
Resource item = Find(resource.Id);
if (item == null)
{
items.Add(resource);
}
else
{
items.Remove(item);
items.Add(resource);
}
}
}
Next up you can see the ResourceController with its basic setup and a (not yet) implemented POST method.
[Route("/api/[controller]")]
public class ResourceController : ControllerBase
{
private readonly IResourceRepository _repository;
public ResourceController(IResourceRepository repository)
=> _repository = repository;
[HttpPost]
public void Post()
{
// implementation comes in next section
}
}
We will now look at the important points of this controller:
- As I mentioned in another post the methodname is not part of the url (like with action methods on non api controllers), instead it is essentially arbitrary, the Routing Attribute and the HttpXXX Attribute determine method is invoked when the request is handled from an API controller. So I tend to name it like the http Verb that is applied to the method.
- We defined the Route Attribute on the class level so that all routes are prefixed with “/api/[controller]/” part. (Note the inconsistency of the Route attributes controller parameter in square brackets in contrast to the curly brackets of the route definition in the Startup class)
- As mentioned in the post about API controllers, api controllers actually only support Attribute routing.
- The Post method must be decorated with the HttpPost Attribute to only allow POST requests to invoke this method. We exclude any further routing information so it can be invoked with the following URL: http://localhost:5000/api/resource/ and a POST Verb in the http header of the request.
- You can set the port number for your api go at /Properties/launchSettings.json. Edit the JSON object with the name of your project by editing the “applicationURL” : “http://localhost:5000/api/resource”. You can also edit the launch url there.
Now we will implement the Post method for a restful behavior. For this we have two options in principle. Either we use the query string and reassemble the Resource with boiler plate code, or we use the Model Binding feature of Asp.Net Core and the FromBody Attribute in front of the incoming resource parameter. I recommend the latter approach because it avoids lots of the left/right assignment boiler plate code.
So the method would look like this:
...
public IActionResult Post([FromBody] Resource resource)
{
if (!ModelState.IsValid)
{
return BadRequest();
}
_repository.Save(resource);
return CreatedAtAction(nameof(Get), resource.Id);
}
...
The condition of !ModelState.IsValid determines if the parsed JSON from the http request body can be deserialized into a fully useable object. For this to work properly we need to apply the Required Attribute from System.ComponentModel.DataAnnotations on the Resource class like so:
public class Resource
{
[Required]
public int Id{ get; set; }
[Required]
public string Name { get; set;}
}
Note that:
- You could validate the Model state by yourself, but it is much easier to use the given methods of the
ControllerBase class. - If the modelstate is not valid we return a BadRequestResult of type IActionResult with an status code of 406 which translates to Not Acceptable.
- If the state is valid you should then apply domain specific validation, which we omitted here. We simply save the Resource with the IResourceRepository.
- To make the post method appear as a RESTful method by the standard I layed out at the beginning of the post, we need to supply the Location of the created Resource. This is done by the use of the CreatedAtAction method. What this does is, that you will get a Location Header in the http Response Header.
- Other possible status codes could be 201 Created or 202 Accepted which means the request is enqueued for further processing.
When we did the setup for all this, we now can build and run the application with (remember to run dotnet restore, dotnet build first)
dotnet /bin/mywebapi.dll which will then let your application listen on your specified port for incoming requests.
We can then test the implementation with Postman like so (yellow boxes indicate changes and results on send)
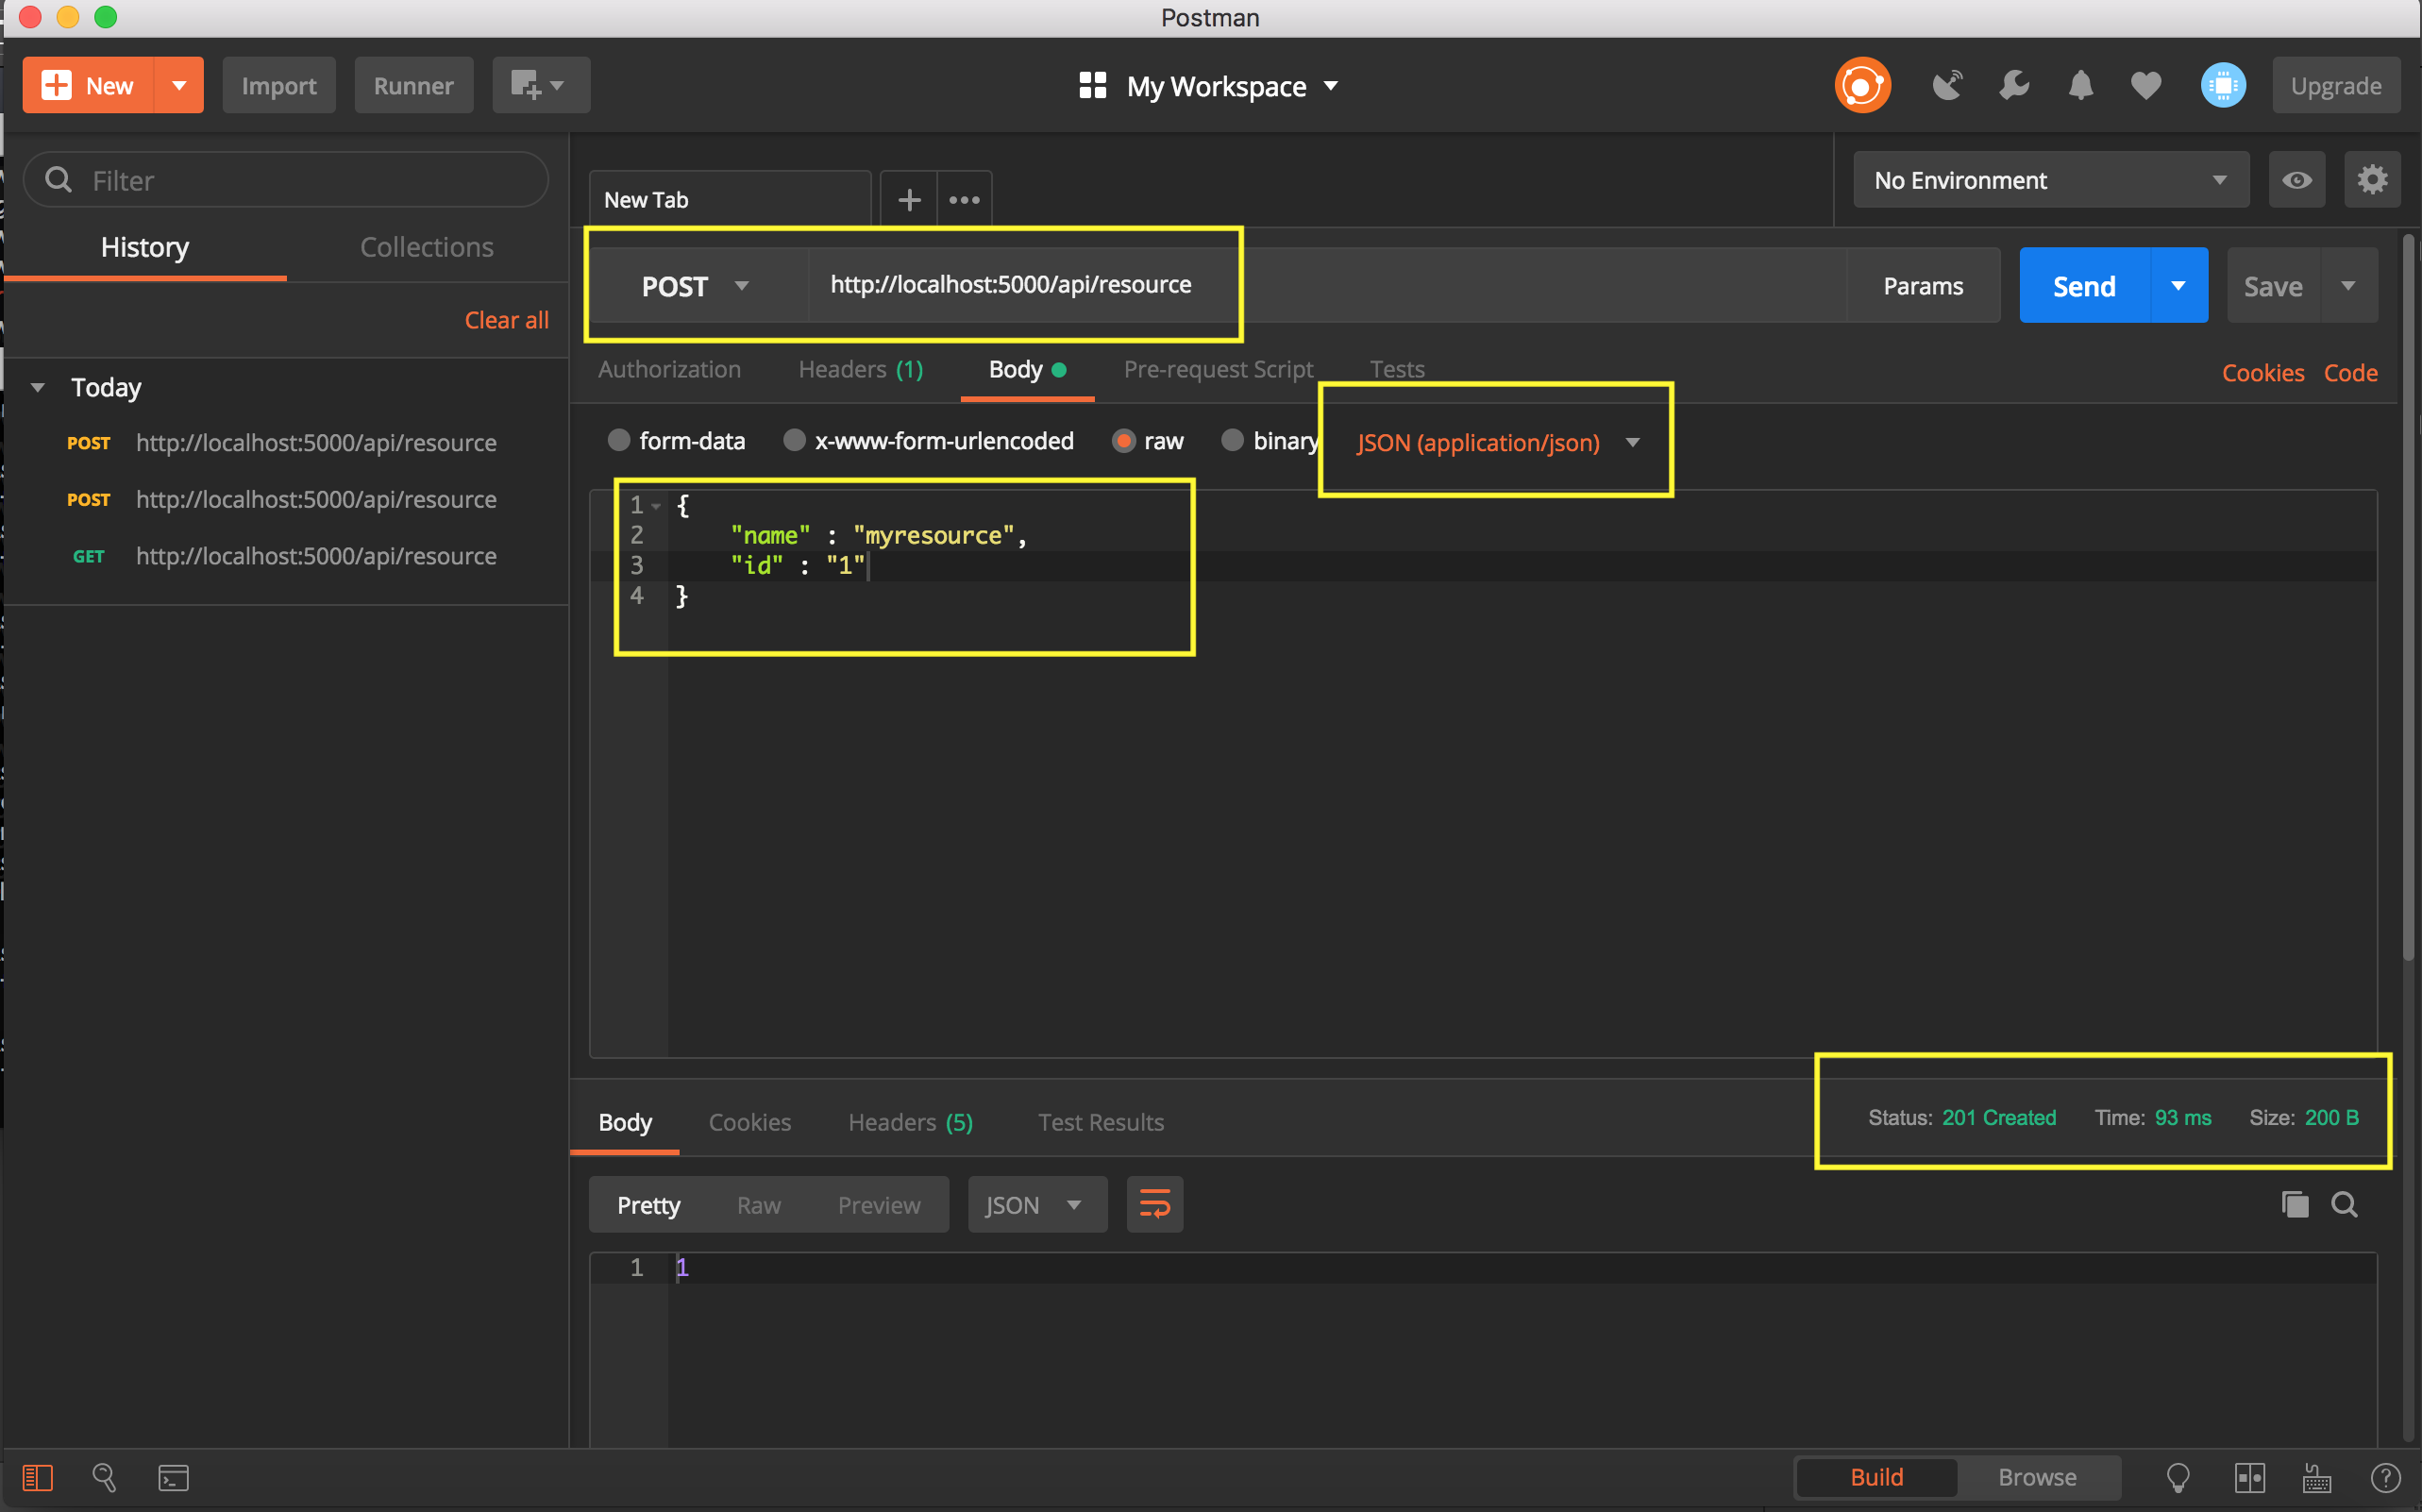
If you open the header section in the response section you will see the result of the CreatedAtActionResult:
Location : "localhost:8080/api/resource/1"
On the Next page we will implement a GET method (Read from CRUD) and request the created resource from POST with postman.
0 Comments